User Roles & Permissions
Manage user roles, access levels, and permissions for your HelloShift property — control who can see and do what.
Control what users can see and do in HelloShift through roles and permissions. Assign users to departments, designate managers, and configure site-wide permission settings.
Overview
Role Types
HelloShift uses a three-tier role system:
Staff
Basic team member access.
Manager
Supervisory access within a department.
Admin
Full site access and management.
Assigning Roles
Setting a User's Role
Go to Admin > Users / Departments
Find the user and click Edit
Configure role settings:
Click Save Changes
Role Hierarchy
Admin (site-level)
  └── Manager (department-level)
        └── Staff (basic access)
Notes:
A user can be both Admin and Manager/Staff
Admin status is independent of department role
Manager role only applies within the assigned department
Departments
Users are assigned to departments (also called "Personas") that determine their team and communication channels.
Default Departments
Every site includes four default departments:
Department Capabilities
Each department has:
A communication channel (wall) for team messages
Ability to receive @mentions
Task assignment routing
Notification preferences
Creating Custom Departments
Go to Admin > Users / Departments
Click the Departments tab
Click Add Department
Enter department name
Click Create
The new department appears in user assignment options.
See How To Use Tags (#) & Mentions (@) for @mentioning departments.
Permission Settings
By default, HelloShift is an open platform where everyone has all the information they need to provide the best guest service. However, you can enable role-based restrictions if needed.
Accessing Permission Settings
Go to Admin > Settings > Staff
Find the Enable role-based permissions checkbox

The Role-Based Permissions Toggle
Permission Matrix (When Enabled)
Staff Role:
✅ Can view their own department's content
✅ Can view their personal tasks and notes
❌ Cannot view guest details (unless Front Desk)
❌ Cannot assign rooms (unless Front Desk or Housekeeping Manager)
❌ Cannot see other departments
Manager Role:
✅ All Staff permissions
✅ Can view all departments
✅ Can assign rooms (if Housekeeping Manager)
✅ Enhanced department management capabilities
❌ Cannot perform admin functions (user management, site settings)
Admin Users:
✅ Full access to all actions regardless of department
✅ Can add users, create checklists, manage settings
✅ Admin status overrides all role-based restrictions
Department-Specific Permissions
Housekeeping:
Staff: Room cleaning for assigned rooms only
Manager: Full room assignments and updates
Front Desk (Cross-Department Access): Front Desk staff automatically receive enhanced access:
✅ Can view guest details
✅ Can view Housekeeping department activities
✅ Can manage room assignments and updates
✅ Can view Maintenance department tasks
Department-Based Access
What Users Can See
With "View All Departments" permission:
All department walls and activity
All team members' tasks and notes
Without "View All Departments" permission:
Only their assigned department
Front Desk staff also see Housekeeping and Maintenance (for operational needs)
Task and Note Visibility
Special Permissions
Guest Details Access
Controls who can see:
Guest names (vs. anonymized)
Phone numbers and emails
Reservation details
Conversation history
Who has access (when role-based is enabled):
Admins: Always
Front Desk: Always
Managers: Always
Other Staff: No
Room Assignment Access
Controls who can:
Assign rooms to housekeepers
Update room status
View cleaning assignments
Manage housekeeping board
Who has access (when role-based is enabled):
Admins: Always
Front Desk: Always
Housekeeping Managers: Yes
Housekeeping Staff: No (view only)
Creating and Managing Users
Adding a New User
Sign in with an Admin account
Go to Admin > Users / Departments
Click Invite User
Complete the invite form:
Click Send Invite
The user record is created instantly. If you included an email, they receive an invitation link to set a password and download the mobile app.

Adding Existing Users
If a staff member already exists at another property:
Choose Add Existing User instead of sending a fresh invite
Search for the user by name or email
Select the user to add them to this site
User Account Options
Finding the site code: Go to Admin > Users / Departments and look for the yellow banner at the top of the list showing your site's 3-digit code.

Invite Status
Users display as Invited until they complete sign-up. From the ⋮ menu next to their name, you can:
Resend the invitation
Cancel the invite
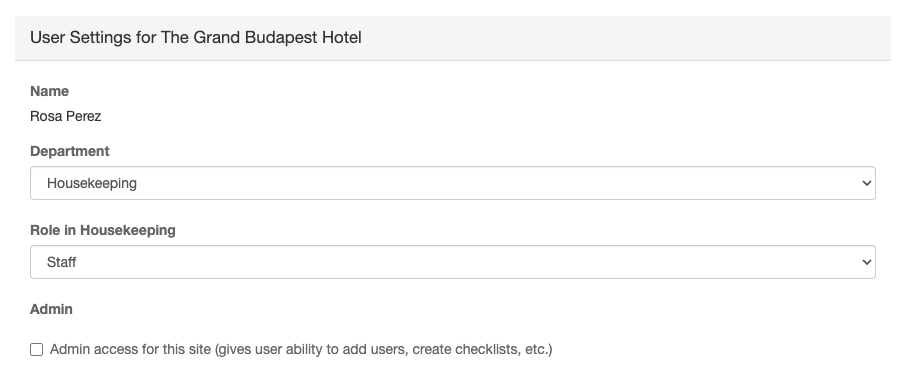
Editing User Settings
Go to Admin > Users / Departments
Click Edit next to the user
Modify settings:
Department
Role (Staff/Manager)
Admin status
Notification preferences
Home page
Click Save Changes
Removing a User
Go to Admin > Users / Departments
Click Remove from Site next to the user
Confirm removal
Notes:
Cannot remove the last admin
User's historical activity is preserved
User can be re-added later
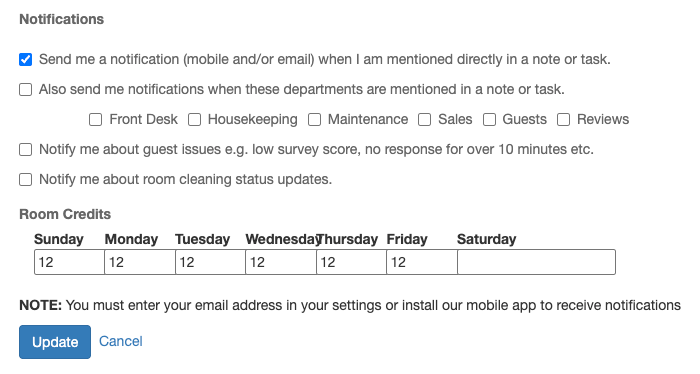
Notification Settings
Configure what alerts each user receives. After the invite is accepted, open the user profile to adjust alerts.
Per-User Notification Options
Pause All Notifications
Toggle the Notifications On / Off switch at the top of the user profile to pause everything for vacation or seasonal staff.
Setting User Notifications
Go to Admin > Users / Departments
Click Edit next to the user
Configure notification toggles
Click Update
Users can also configure their own notifications in their profile.
Room Credits (Housekeeping)
For housekeeping staff, set how many rooms they can handle each day for workload balancing.
Setting Room Credits
Go to Admin > Users / Departments
Click Edit on a housekeeping user
Find the Room Credits section
Enter credits for each day of the week (e.g., Mon: 5, Tue: 6, Wed: 5...)
Click Update
HelloShift uses these values for auto-assignment and workload balancing. See Housekeeping Credit System for details.
Password Reset
User Has Email
User clicks Forgot password on the login page
They follow the emailed link to reset
User Has No Email
Admin goes to Admin > Users / Departments
Click Edit on the user
Enter a new password
Click Save
Best Practices
Role Assignment
Minimize Admins: Only grant admin to users who need it
Use Manager for Supervisors: Managers can oversee without full admin access
Match Departments: Assign users to their actual team
Permission Configuration
Start Permissive: Leave role-based permissions off initially
Enable as Needed: Turn on role-based restrictions if required
Test Changes: Verify users can still do their jobs after changes
User Management
Use Real Emails: Enables password reset and notifications
Clear Naming: Use full names for easy identification
Regular Audits: Review user list periodically for inactive accounts
Troubleshooting
User can't see guest information
Possible Causes:
Role-based permissions enabled
User is not Front Desk or Manager
"View Guest Details" turned off
Solutions:
Assign user to Front Desk
Make user a Manager
Enable "View Guest Details" site-wide
User can't assign rooms
Possible Causes:
Role-based permissions enabled
User is Housekeeping Staff (not Manager)
"Manage Room Assignments" turned off
Solutions:
Promote to Housekeeping Manager
Make user Admin
Enable "Manage Room Assignments" site-wide
User can't see other departments
Possible Causes:
Role-based permissions enabled
User is Staff (not Manager)
"View All Departments" turned off
Solutions:
Promote to Manager
Enable "View All Departments" site-wide
Make user Admin
Can't remove a user
Possible Causes:
User is the last/only Admin
You don't have Admin access
Solutions:
Assign another admin first, then remove
Have another admin perform the removal
Related Articles
How To Use Tags (#) & Mentions (@) - @mentioning departments
Multi-Site Management - Managing multiple properties
Site Settings - Site-wide configuration