All About Guest Messaging
Send and receive guest messages via SMS, email, and web chat — automate responses and manage conversations in HelloShift.
HelloShift's Guest Messaging module enables seamless communication with guests across multiple channels—SMS, Email, WhatsApp, Web Widget, and Facebook Messenger. From pre-arrival to post-checkout, you can automate outreach, respond to inquiries, and manage all conversations from a unified inbox.
Overview
Messaging Channels
HelloShift supports multiple communication channels:
Channel Configuration
Configure channels at Admin > Settings > Guest > Messaging :
Enable desired channels
Configure credentials for each channel
Set default channel for outbound messages
Configure channel-specific settings (signatures, auto-replies)
Unified Inbox Setup
Bring messages from OTA platforms like Airbnb, VRBO, Booking.com, and Expedia into one streamlined workflow.
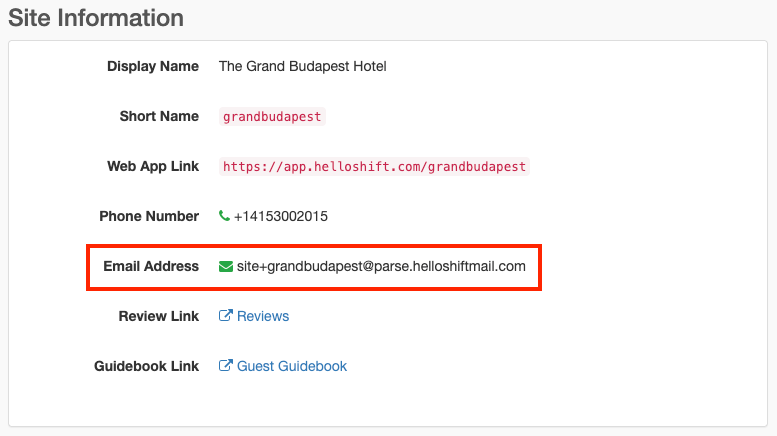
How to Connect External Site Messages
Navigate to Admin > Site Info in HelloShift
Copy your Site Email Address
Paste it into the relevant OTA platform (see instructions below)
Platform-Specific Instructions
Airbnb
Go to Account > Personal Info
Click Edit beside your email
Replace with your Site Email Address
Click Save
Tip: To avoid changing your Airbnb login, set up email forwarding instead.
VRBO
Go to My Account > Account Settings > Account Information
Enter Site Email Address in the Email 2 field
Add this address to the Contacts section of each listing
Booking.com
Go to Extranet > Account > Contacts/Notifications
Insert Site Email Address under Reservations in Contacts section
Expedia
Access Email Notification Settings
Add your Site Email Address
Choose which notifications to send there
Contact Expedia support if needed
Why This Matters
Forwarding messages from OTA platforms centralizes guest communication. This unified workflow ensures no inquiry is missed and simplifies staff response across channels.
Guest Directory
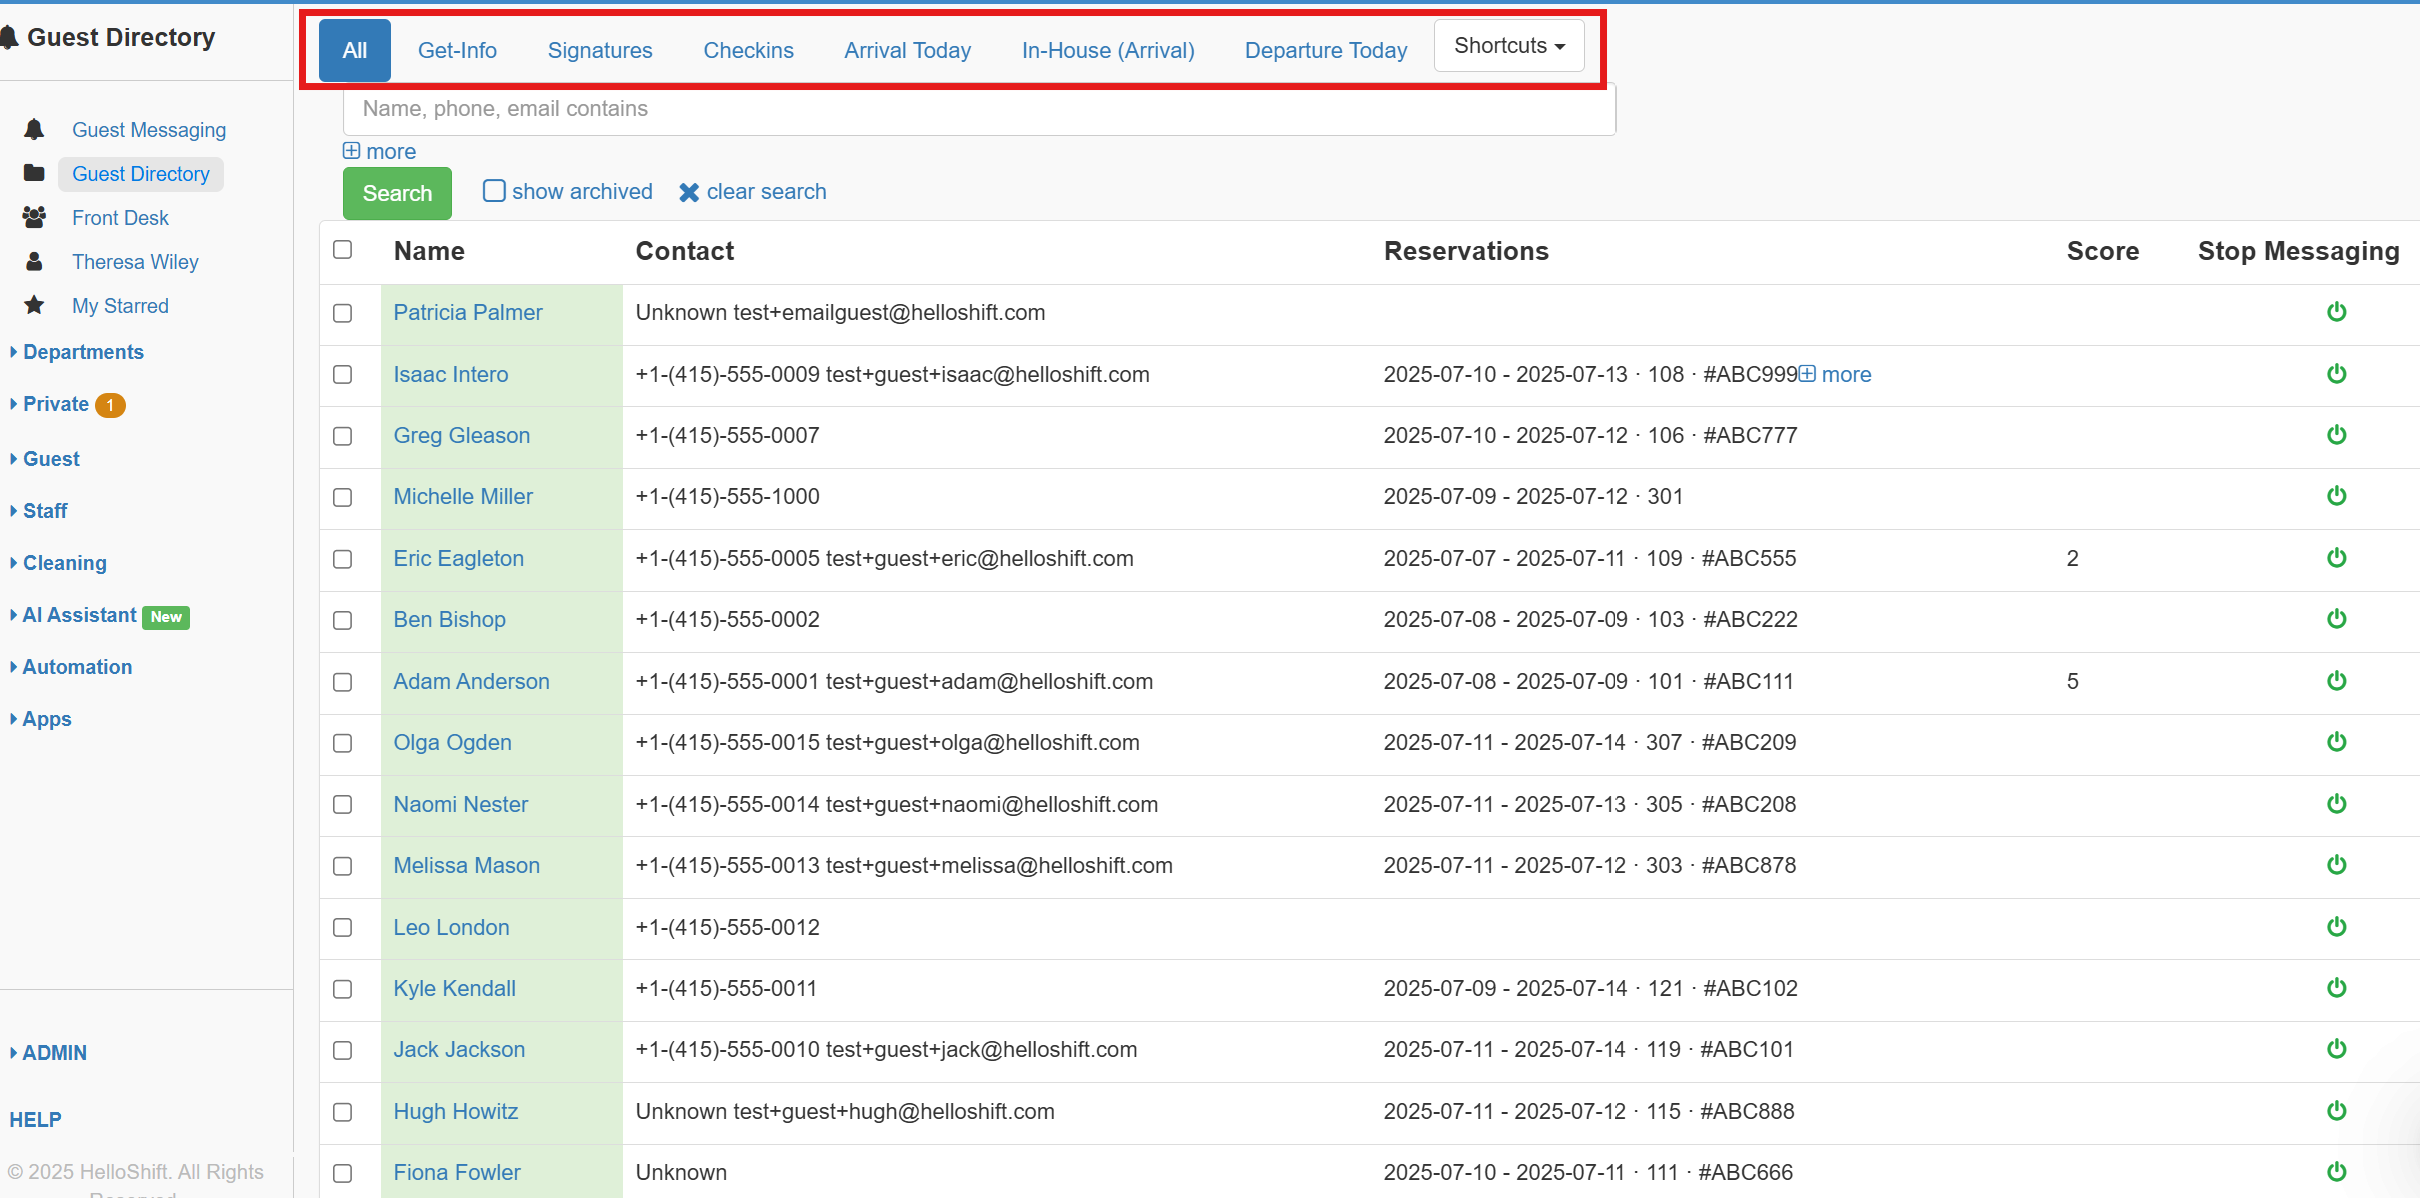
The Guest Directory shows all guests with their stay information and messaging status.
Accessing the Directory
Go to Guest Directory
You'll see a list of guests with their stay details
Filtering Guests
Filter the directory by stay status to target specific guest segments:
Additional filters:
Unresolved - Guests with pending message threads
VIP - Guests tagged as VIP
By Room - Filter by room number
By Booking Source - Filter by OTA or booking channel
Guest Profile Information
Each guest profile displays:
Guest name and contact info
Stay dates (arrival → departure)
Room number(s)
Confirmation number
Guest type/tags (VIP, Loyalty, etc.)
Message status indicator
Check-in status
Adding a New Guest to an Existing Reservation
To add a guest (such as a companion) to an existing reservation:
Go to Guest Directory
Search for the primary guest
Click on the guest's name to open their profile
Find the reservation on the right side
Click the three dots (⋮) next to the reservation
Select Edit
Click Add Guest
Enter the new guest's name, phone number, and email (optional)
Click Update Reservation
The new guest will be added to the same reservation and room number.
Merging Duplicate Guests
When the same guest appears as two records — because a PMS sent duplicates, a guest texted from a new number, or staff created a manual record before the PMS sync caught up — you can merge the duplicate into the canonical record. All notes, messages, tasks, stays, and history move to the keeper; the duplicate is removed.
Permissions: Merge is admin-only. Operator and Staff roles do not see the menu option.
How to Merge Two Guest Records
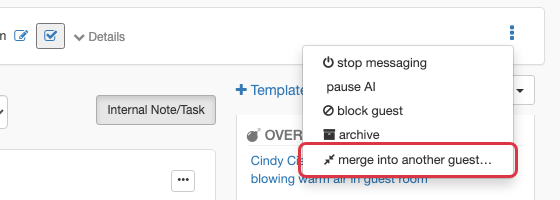
Open the profile of the guest record you want to delete — the duplicate. (You're going to merge this record into the canonical one.)
Open the actions menu at the top of the profile and click merge into another guest…
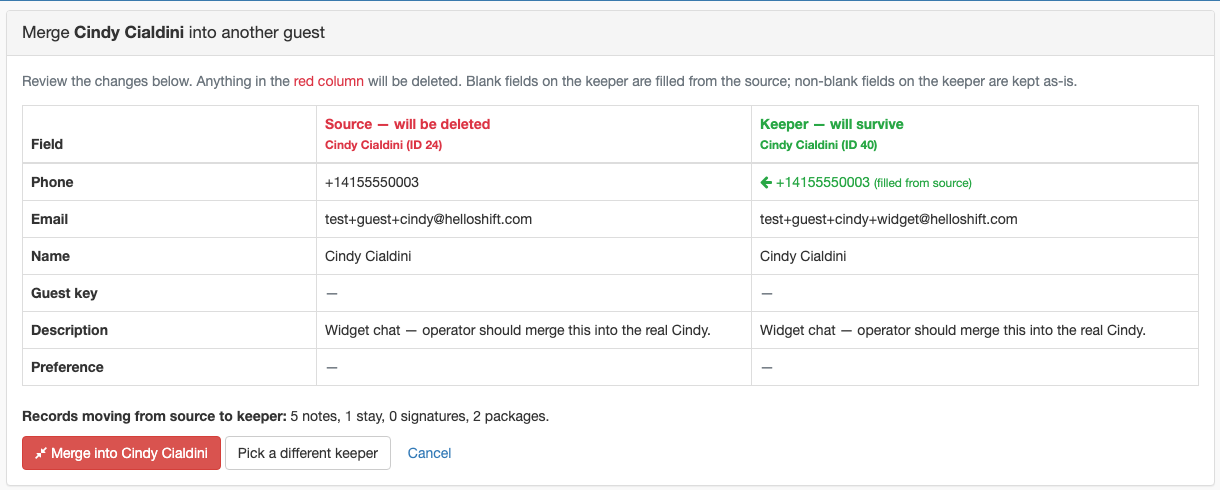
On the merge page, search by name, phone, email, or confirmation number for the keeper — the canonical record you want to survive — and click Select on the matching candidate
Review the side-by-side comparison: the Source — will be deleted column (red) is the profile you opened, and the Keeper — will survive column (green) is the candidate you picked. Confirm the right pair, then check which fields will be filled on the keeper from the source.
Click Merge into [keeper name] and confirm the dialog
What Moves and What Survives
Recovering from a Wrong Merge
Every merge is logged with the user who performed it, the keeper, and the source. If you merge the wrong pair, contact support@helloshift.com with the keeper's guest name — our team can reconstruct the original records from the merge log.
Best Practices
Start from the duplicate, pick the canonical record as the keeper. The page header reads "Merge [this guest] into another guest" — the guest whose profile you opened is the one that goes away.
Open both profiles in separate tabs first and skim recent activity to confirm they're the same person before merging.
Standardize at the source when the same guest keeps coming back as a duplicate from a PMS — fixing the guest's phone or email upstream prevents the duplicate from reappearing on the next sync.
Inbox
The Inbox is your central hub for all guest conversations.
Accessing the Inbox
Go to Guest Messaging (or click the inbox icon)
Conversations are listed on the left, message thread on the right
Inbox Filters
Filter conversations using the dropdown (defaults to Recent):
Tip: The badge count shows unresolved message count.
How Resolution Works
Unresolved threads are conversations where the guest sent a message and staff hasn't responded yet
When you reply to an unresolved thread, it automatically becomes resolved
Use the Resolve button to manually mark a conversation as resolved without replying
Guests can reopen threads by sending new messages
Message Thread Features
Within a conversation thread:
Notification Settings
Configure who receives notifications for new guest messages:
Go to Admin > Settings > Guest > Messaging
Set Guest Alert User - choose:
Everyone (all staff receive notifications)
Only Front Desk (only that Front Desk receives guest notifications)
Individual users can configure their notification preferences in their profile

Direct Outreach
Send a direct message to any guest from the directory.
Sending a Direct Message
Go to Guest Directory
Find the guest you want to message
Click Message (or the message icon)
Compose your message or select a snippet
Choose the channel (SMS, Email, WhatsApp)
Click Send or Schedule for later
Available Actions on Guest Profile
Blocking Guests
Block a guest to silently drop all their inbound messages across every channel (SMS, WhatsApp, Messenger, web widget). Blocked guests receive no error or auto-reply—messages simply stop arriving in your inbox.
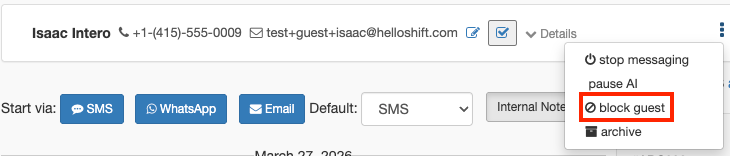
How to Block a Guest
Open the guest's profile from the Guest Directory or Inbox
Click the three-dot menu (⋮) at the top of the profile
Select Block Guest
Confirm the dialog: "Block this guest? All future messages will be silently dropped."
What Happens When a Guest is Blocked
Unblocking a Guest
Search for the guest by name, phone, or email in the Guest Directory
Open their profile
Click the three-dot menu (⋮) and select Unblock Guest
Note: After unblocking, outbound messaging ("Stop texting") remains off. A staff member must separately re-enable texting if needed.
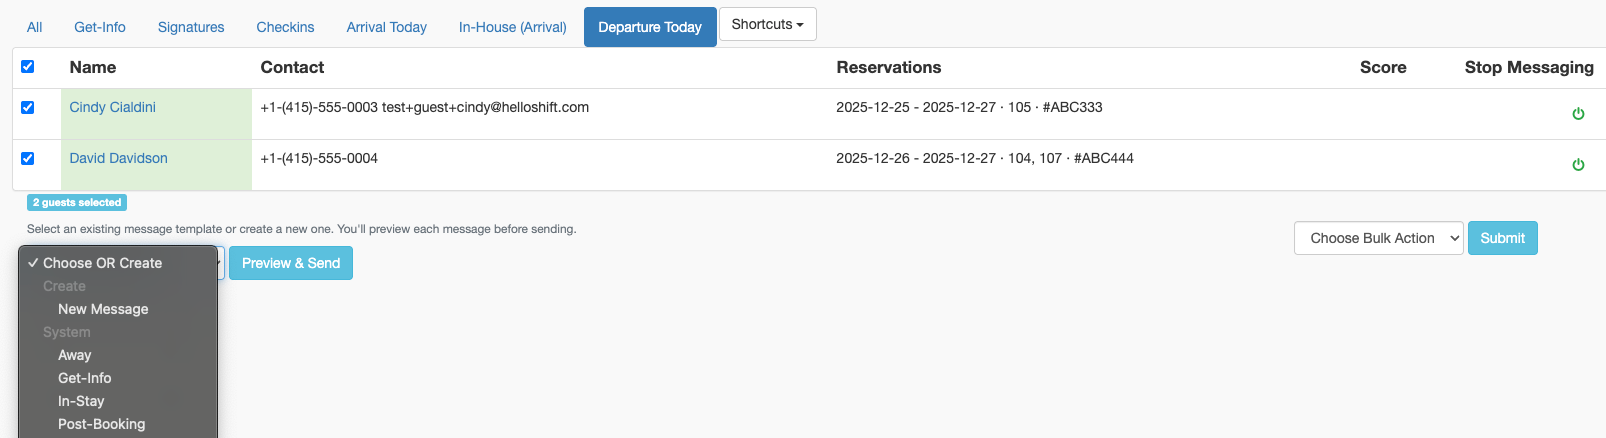
Bulk Blocking
Block multiple guests at once from the Guest Directory:
Select guests using the checkboxes
Open the bulk action dropdown
Select Block
Use cases: Silence repeated prank or spam senders, block OTA relay numbers that generate noise.
Broadcast Messaging
Send messages to multiple guests simultaneously with Broadcast Messaging.
Creating a Broadcast
Go to Guest Directory
Apply filters to select your target audience (e.g., "Arriving Today")
Multi-select guests using checkboxes
Click Send Message to Selected
Compose your message or select a snippet/template
Review recipients
Choose: Send Now or Schedule for later
Click Send
Broadcast Workflow
Filter → Multi-select → Compose/Template → Schedule (optional) → SendBroadcast Use Cases
Scheduling Broadcasts
To schedule a broadcast for later:
Complete steps 1-5 above
Click Schedule instead of Send Now
Select date and time
Click Schedule
Scheduled broadcasts appear in Guest > Scheduled Messages where you can edit or cancel them.
Snippets & Templates
Snippets are reusable message templates with dynamic variables.
What Are Snippets?
Snippets let you:
Save frequently used messages
Personalize with variables (e.g.,
{{firstName}})Ensure consistent messaging
Speed up response time
Creating a Snippet
Go to Guest > Snippets
Click New Snippet
Enter a Name (for easy reference)
Select the Channel (Text, Email, WhatsApp, FAQ, Agreement)
Write the Body with variables
Click Save
Variables
Use these variables to personalize messages:
Example Snippet
Name: Pre-Arrival Welcome
Body:
Hi {{firstName}}!We're excited to welcome you to our hotel on {{arrivalDate}}.Check-in starts at 3 PM. Complete your check-in now: {{checkinUrl}}Your room: {{roomNumber}}Questions? Reply to this message!Snippet Types
Using Snippets
When composing a message:
Click Use Snippet (or the template icon)
Search or browse snippets
Click to insert
Variables are automatically replaced with guest data
Edit if needed, then send
Conditional Content with Liquid
For advanced use cases, use Liquid syntax for conditional content:
{% if guest_stay.guest_type contains 'VIP' %}As a VIP guest, enjoy complimentary late checkout!{% else %}Checkout is at 11 AM.{% endif %}See Snippets & Templates for detailed template documentation.
Message Automations
Automate message delivery based on guest lifecycle events or schedules.
Types of Automations
Accessing Automations
Go to Automations
View existing automations
Click New to create an automation
Creating a Scheduled Automation
Click New Automation
Select Audience (who receives the message):
Arriving Today
Arriving Tomorrow
In-House
Departing Today
Departing Tomorrow
Custom condition
Choose Action (which snippet to send)
Set Send Time (e.g., 2:00 PM)
Set Schedule (daily, specific days)
Add Condition (optional filter)
Enable and save
Common Automation Examples
Custom Conditions
Add conditions to target specific guests:
{% if guest_stay.guest_type contains 'VIP' %}true{% else %}false{% endif %}{% assign nights = guest_stay.nights | plus: 0 %}{% if nights > 3 %}true{% else %}false{% endif %}Delay Feature
For event-based triggers, add a delay:
See Guest Automations for detailed automation configuration.
FAQ & AI Assistant
Train HelloShift's AI to automatically respond to common guest questions.
How AI Assistant Works
Guest sends a message
AI analyzes the message against trained FAQs
If confident match found → auto-responds with FAQ answer
If no match → routes to staff inbox
Setting Up FAQs
Go to Guest > Snippets > FAQ
Review default FAQ snippets
Create new FAQ snippets for common questions
Test with sample messages
Creating FAQ Snippets
Click New Snippet
Select FAQ as the channel type
Enter the Name (the question pattern)
Enter the Body (the answer)
Save
Example FAQs
Training Best Practices
Add variations - Include different ways guests ask the same question
Be specific - More detail in answers reduces follow-up questions
Use variables - Personalize when possible
Review regularly - Check unresolved threads for new FAQ opportunities
Test thoroughly - Send test messages to verify AI responses
See AI Assistant Configuration for advanced AI settings.
Pausing AI for a Guest
When you are handling a guest conversation and want to prevent the AI from responding:
Open the guest conversation
Click the pause AI button (robot icon) in the guest toolbar
The AI will not respond to this guest until you click resume AI
This is useful when a staff member is actively managing a complex request — the AI will not interrupt or send conflicting responses. Other guests continue to receive AI responses as normal.

Scheduling Messages
Schedule messages for future delivery instead of sending immediately.
How to Schedule a Message
Compose your message (direct or broadcast)
Click Schedule instead of Send
Select date and time
Click Schedule Message
Viewing Scheduled Messages
Go to Guest > Scheduled
See all pending scheduled messages
Click to edit or cancel
Schedule Use Cases
Sending Files & Images
Attach files and images to guest messages.
Supported Channels for Attachments
Sending an Attachment
Open message composer
Click the Attach icon (paperclip)
Select file from your device
Preview attachment
Add message text if desired
Send
Common Attachment Use Cases
Room photos for pre-arrival
Property maps
Event flyers
Menu PDFs
Check-in instructions documents
Best Practices
Personalization
Always use variables for guest names
Reference specific stay details (room, dates)
Acknowledge guest type (VIP, loyalty members)
Segmentation
Create automations for each guest lifecycle stage
Use different messaging for OTA vs direct bookings
Customize content for VIP guests
Timing
Pre-arrival: 24-48 hours before check-in
Welcome: Within 30 minutes of check-in
Mid-stay check: Day 2 of multi-night stays
Pre-checkout: Evening before or morning of departure
Post-stay: 24 hours after checkout
Response Management
Aim for <5 minute response time during business hours
Set up FAQ auto-responses for after hours
Use the "Resolve" button to keep inbox clean
Assign complex issues to specific team members
Channel Selection
Troubleshooting
Messages not sending
Verify channel is configured correctly
Check guest has valid phone/email
Confirm Twilio credentials are valid
Review any error messages in the thread
Guest not receiving messages
Verify contact info is correct
Check if guest opted out (do not send flag)
Review carrier/spam filtering
Try alternate channel
Automation not firing
Confirm automation is enabled (Active)
Verify audience filter matches guests
Check schedule time and timezone
Review any conditions that might block
AI not responding correctly
Review FAQ snippets for accuracy
Add more question variations
Adjust confidence thresholds
Check for conflicting FAQ patterns
Related Articles
Snippets & Templates - Detailed template documentation
Guest Automations - Automation configuration guide
AI Assistant Configuration - AI assistant settings
Twilio Setup - SMS/Voice configuration
WhatsApp & Messenger Setup - WhatsApp Business API