Room & Cleaning Automations
Automate room status changes and cleaning assignments with triggers and scheduled room jobs in HelloShift.
Automate room status changes and cleaning assignments in HelloShift. There are two types of automations:
Triggers - React to guest events (checkout, check-in, cancellation)
Room Automations - Run on a schedule to create cleaning tasks automatically
Overview
Part 1: Room Automations (Scheduled Automations)
Room Automations automatically create cleaning tasks based on schedules and guest stay patterns. They run daily at a configured time and apply to rooms matching specific conditions.
Accessing Room Automations
Go to AI & Automation > Scheduled Automations > Room
Click the Room Automations tab
You'll see a list of available room automations

Default Room Automations
HelloShift creates these room automations when you set up your site:
Daily Clean
Condition: Mid-stay guests (guests currently in-house, not arriving or departing)
Schedule: Daily at 6:00 AM
Action: Create "Clean" task
Purpose: Ensures stayover rooms get daily cleaning tasks
Departure Clean
Condition: Guests departing today
Schedule: Daily at 6:00 AM
Action: Create "Clean" task
Purpose: Creates checkout cleaning tasks for departing guests
Day 3 Clean (Every 3 Days)
Condition: Mid-stay guests on day 3, 6, 9, etc. of their stay
Schedule: Daily at 6:00 AM
Action: Clean on match, Light Clean otherwise
Purpose: Reduces daily cleaning for long-stay guests while ensuring periodic full cleans
Schedule-Based Clean
Condition: Rooms with custom schedules configured
Schedule: Daily at 6:00 AM
Action: Create "Clean" task only if room's schedule matches today
Purpose: Respects individual room cleaning schedules (e.g., "clean Mondays and Thursdays")
Import Room Data
Condition: All rooms
Schedule: Daily at 6:00 AM
Action: Pull room status from PMS
Purpose: Syncs room occupancy and status from your Property Management System
Room Automation Settings
Each room automation has these configurable options:
Available Checks
Custom Check Example
For properties with VIP-specific cleaning schedules:
{% if guest_stay.guest_type contains 'VIP' %}true{% else %}false{% endif %}Available Actions
The room-status actions need a guest condition (Departure Today, Arrival Today, etc.) - they are not available on the All Rooms condition.
Example: Flip Departing Rooms Dirty at 6 AM
Housekeeping wants departing rooms on the Dirty list at the start of the day, without waiting for the guest (or the PMS) to check out:
Condition: Departure Today
Run At: 6:00 AM, daily
Action: Set Room Vacant/Dirty
This works alongside the default Post-Checkout Room Update trigger: the 6 AM automation pre-marks rooms by departure date, and the trigger re-fires on the actual checkout event. Flipping an already-dirty room is a silent no-op, so having both never double-notifies.
Creating a Custom Room Automation
Beyond the default automations, you can create your own scheduled room automations — including automations that generate checklists and tasks. Click New Room Automation on the Room tab (AI & Automation > Scheduled Automations > Room; requires the Housekeeping plan).
A custom room automation combines:
For Guests: which stays to target by date — for example Departure Today matches every guest whose departure date is today, whether or not the PMS has checked them out. Use Departure Today (Not Checked Out) to target only guests still in-house.
Run At + Repeat: the time of day and recurrence — e.g., 6:00 AM daily.
Condition (optional): an additional check, including custom Liquid conditions.
Action: a cleaning task, or Create Checklist / Create Task with a picker for which template to use.
How generated checklists and tasks behave:
One per room per day: a reservation with several guests still produces exactly one checklist or task per room. Multi-room reservations get one per room.
Room-tagged and guest-linked: items land on the room page and housekeeping boards, linked to the guest.
No double-generation: if a Trigger already created the same checklist or task for that room today (or the automation is run twice), no second copy is created.
Checklist skip threshold: if the room’s recent copies of the same checklist are all still incomplete, a new one is skipped.
No room, no item: stays without a room assignment are skipped.
Safe template handling: if the selected template is later deleted or archived, the automation deactivates itself and warns once instead of failing silently.
Use Preview before activating: it lists exactly which rooms match today, what would be created for each, and flags rooms the live run would skip (with the reason).
Example — the most common setup: name it “Departure Checklists”, set For Guests to Departure Today, Run At 6:00 AM daily, Action Create Checklist with your checkout checklist. Every morning, each departing room gets its checklist — no PMS checkout event required.
Note: The Create Checklist action is available on the Staff plan.
Enabling/Disabling Room Automations
Go to AI & Automation > Scheduled Automations > Rooms
Find the automation in the list
Click Edit
Change Status to Active or Inactive
Click Save
Note: Automations are created as Inactive by default. You must enable them to start generating tasks.
Part 2: Triggers (Event-Based Automations)
Triggers respond to guest lifecycle events and execute actions immediately or after a delay.
Accessing Triggers
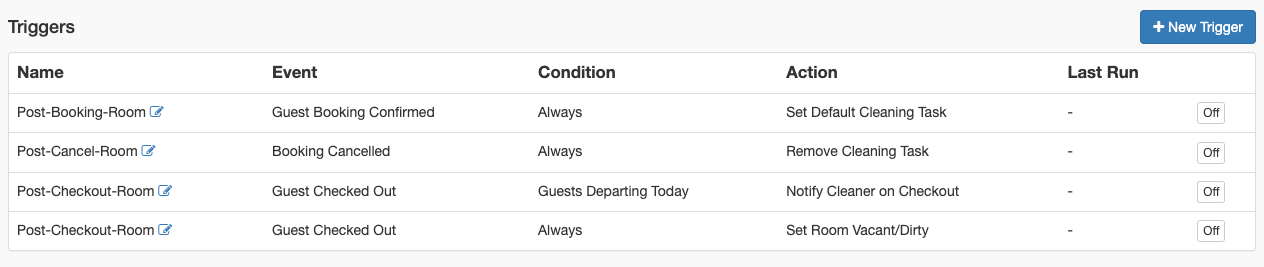
Go to AI & Automation > Triggers
You'll see a list of existing triggers
Click New Trigger to create an automation
Default Triggers
HelloShift creates these system triggers when you set up your site:
Post-Checkout Room Update
Event: Guest Checked Out
Action: Set Room Vacant/Dirty
Purpose: Automatically marks room as dirty when guest departs
Post-Booking Room Assignment
Event: Guest Booking Confirmed
Action: Set Default Cleaning Task
Purpose: Pre-assign cleaning task based on room's default
Post-Cancel Room Update
Event: Booking Cancelled
Action: Remove room assignment if applicable
Creating a Trigger
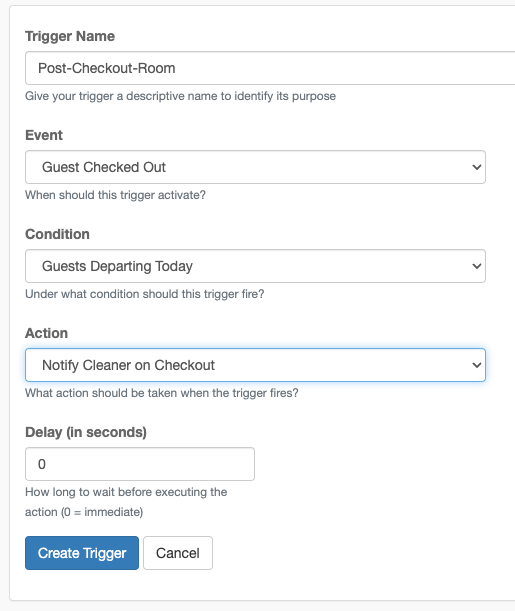
Step 1: Choose the Event
Select when the automation should trigger:
Step 2: Set a Condition (Optional)
Add conditions to limit when the automation runs:
Step 3: Choose the Action
Select what happens when the trigger fires:
Step 4: Set Delay (Optional)
Add a delay before the action executes:
0 seconds (default) = Immediate
300 seconds = 5 minutes after event
3600 seconds = 1 hour after event
Delays are useful for:
Giving front desk time to complete checkout
Allowing for late checkouts
Staggering cleaner notifications
Common Automation Scenarios
Scenario 1: Auto-Mark Dirty on Checkout
Goal: When guest checks out, automatically mark room dirty
Setup:
Event: Guest Checked Out
Condition: Always
Action: Set Room Vacant/Dirty
Delay: 0 (immediate)
Scenario 2: Assign Cleaner on Checkout
Goal: When guest checks out, assign the room's default cleaner
Setup:
Event: Guest Checked Out
Condition: Guests Departing Today
Action: Assign Default Cleaner
Delay: 300 (5 minutes)
Scenario 3: Set Checkout Task for Departures
Goal: Set cleaning task to "Checkout" for departing guests
Setup:
Event: Guest Checked Out
Condition: Always
Action: Set Cleaning Task: Clean
Delay: 0
Note: Create a custom action for "Checkout" task type if needed.
Scenario 4: Notify Housekeeping Lead
Goal: Alert housekeeping supervisor when VIP checks out
Setup:
Event: Guest Checked Out
Condition: Custom (check for VIP tag)
Action: Notify Cleaner on Checkout
Delay: 0
Custom Conditions
For advanced scenarios, write custom Liquid templates that return "true" or "false".
Available Variables
Example: VIP Guests Only
{% if guest_stay.guest_type contains 'VIP' %}true{% else %}false{% endif %}Example: Long Stays
{% assign nights = guest_stay.nights | plus: 0 %}{% if nights > 7 %}true{% else %}false{% endif %}Managing Automations
Enabling/Disabling
Go to Admin > Settings > Automations
Find the trigger in the list
Click the status toggle to enable or disable
Disabled triggers remain configured but don't execute.
Editing a Trigger
Click Edit next to the trigger
Modify delay or condition as needed
Note: Event and Action cannot be changed after creation
Click Update Trigger
Deleting a Trigger
Click Delete next to the trigger
Confirm deletion
System triggers (Post-Checkout-Room, etc.) cannot be deleted
Integration with PMS
Automations work with your PMS integration:
From PMS to HelloShift
PMS sends checkout event
HelloShift marks guest as checked out
Checkout automation triggers
Room condition updates to Dirty
From HelloShift to PMS
When enabled in Cleaning settings:
Cleaner marks room Clean
HelloShift syncs status to PMS
Front desk sees updated room status
Automation Flow Example
Here's how automations work together for a typical checkout:
Guest checks out at front desk (PMS event)
PMS syncs checkout status to HelloShift
Post-Checkout automation fires:
Sets room to Vacant/Dirty
Assigns default cleaner
Cleaner receives notification on mobile
Cleaner starts room and timer begins
Cleaner completes room
Room status syncs back to PMS (if enabled)
Best Practices
Keep It Simple
Start with essential automations (checkout → dirty)
Add complexity gradually as needed
Test each automation before enabling others
Use Delays Wisely
Immediate (0) for status changes
Short delay (5-10 min) for notifications
Longer delay if allowing for late checkouts
Monitor and Adjust
Check that automations fire as expected
Review room status after checkouts
Adjust conditions if too many false positives
Combine with Manual Oversight
Automations handle the common case
Staff can always override manually
Use automations to speed up, not replace judgment
Troubleshooting
Automation not firing
Verify the trigger is enabled (active status)
Check that the event matches (Guest Checked Out vs. Guest Checked In)
Confirm PMS integration is working
Review condition - it may be blocking execution
Room status not changing
Check if another automation might be overriding
For a scheduled Set Room action, confirm the automation is On and its run time has passed today
Verify room exists and is active
Look for delays that haven't elapsed yet
Wrong cleaner assigned
Check room's default cleaner setting
Verify cleaner is active in Housekeeping department
Review if cleaner was changed manually after automation
Notifications not received
Verify cleaner has notifications enabled
Check mobile device push notification settings
Ensure cleaner is assigned to the room
Choosing Between Room Automations and Triggers
Key Differences
Best Practice: Combine Both
For comprehensive automation:
Enable Triggers for immediate room status changes (checkout → dirty)
Enable Room Automations for scheduled task creation and day-start status flips (daily at 6 AM)
Use Credits to balance workload when tasks are created
Review Assignments before cleaners start their shift
Schedule Projection
Room automations can be projected forward to generate cleaning assignments for upcoming days automatically. This gives your housekeeping team visibility into future workload without waiting for each day's automations to run.
How It Works
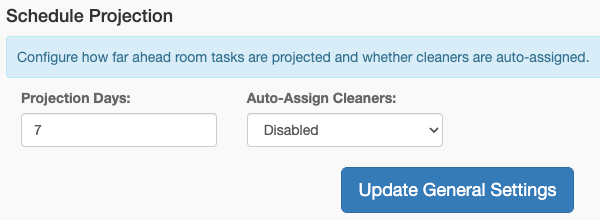
HelloShift evaluates all active room automations nightly and creates assignments for the next N days (configurable, default 7)
Room schedules, stay-based conditions, and day-of-week rules are all respected
The system reconciles each night — adding new assignments, removing stale ones, and preserving manual overrides
Optionally, cleaners can be auto-assigned to projected tasks
Configuration
Go to Admin > Settings > Housekeeping > General and adjust:
For more details on how projected assignments appear on the assignment page, see Room Assignment System > Schedule Projection.
Related Articles
Room Assignment System - Manual and auto assignment options
All About Housekeeping - Complete housekeeping overview
Housekeeping Credit System - Credit-based workload balancing
Pre-cleaning (Strip) Phase - The create_pre_cleaning_task room job and the strip phase
Was this helpful?
Still need help? Ask the team