Test Guest Journey
Send every guest-journey message to the owner, GM or a staff member to review on their own phone, before any automation is switched on.
🧪 Test Guest Journey: Preview Every Guest Message Before You Go Live
Before you switch on your guest automations, you'll want to see exactly what your guests will receive. The Test journey sends every message in your guest journey (booking confirmation, pre-arrival, arrival, in-stay, checkout and post-stay) to one person you choose, usually the owner, the GM or a staff member, on their own phone and inbox.
Your automations stay exactly as they are, on or off. No other guest receives anything.
When to Use It
During onboarding, so the owner or GM can sign off on the wording, timing and links before anything goes live.
After editing a snippet, to check how the change looks on a real phone.
When training staff, so they know what guests see at each stage of their stay.
1. Open the Test Journey
Go to AI & Automation > Scheduled Automations and click the Test journey tab (next to Message, Key and Room). You can also open it from the Test journey button on the Triggers page.
ℹ️ Only admins can see this page, because it sends real messages.
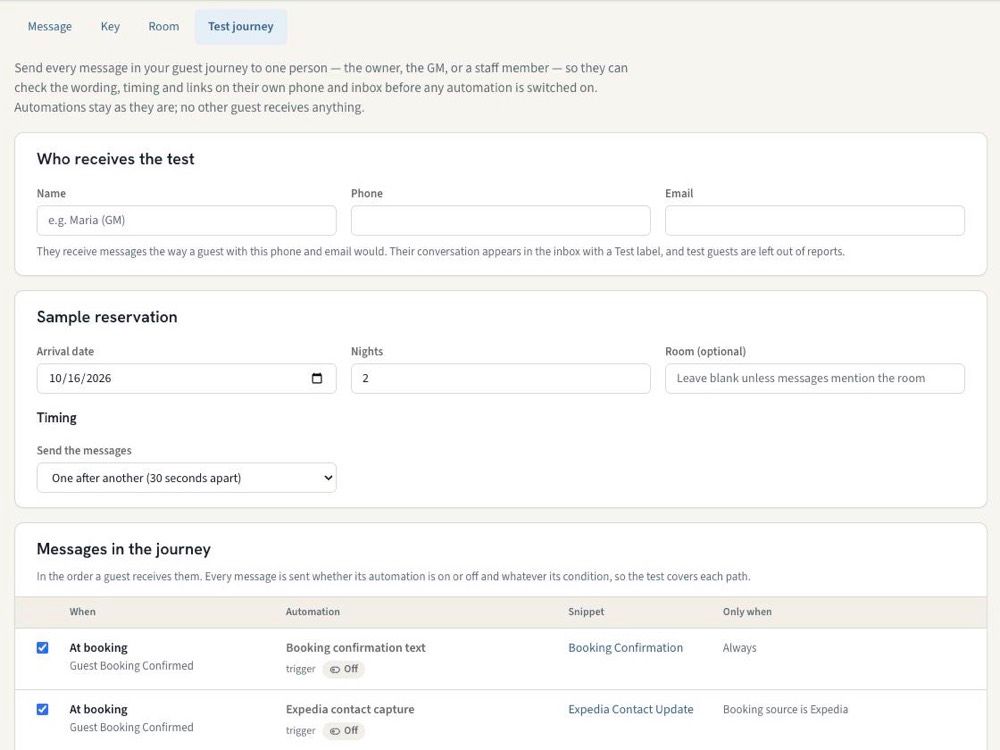
2. Choose Who Receives the Test
Enter the person's Name plus a Phone number, an Email address, or both. They receive messages exactly the way a guest with that phone and email would, by text, WhatsApp or email depending on your channel settings.
⚠️ If that phone number or email already belongs to a guest with reservations, HelloShift won't use it, so that guest's real reservations keep receiving their messages. Use a different number or email instead.
3. Set Up the Sample Reservation
Each test run creates a sample reservation (with a confirmation number starting with TEST-) so your messages fill in realistic details such as the guest's first name, arrival and departure dates, confirmation number and check-in link.
Arrival date: defaults to three days from today.
Nights: defaults to 2.
Room (optional): leave this blank unless your messages mention the room number.
💡 The check-in link in the test messages opens the real guest check-in flow for the sample reservation, so the test person can walk through it just like a guest.
4. Choose the Timing
A real guest receives these messages over days or weeks. The test squeezes them into minutes. Under Send the messages, pick:
One after another (30 seconds apart): the whole journey arrives in one sitting.
Every 2, 5 or 15 minutes: more time to read each message before the next one arrives.
5. Review the Messages in the Journey
The page lists every message automation and every trigger that sends a message, in the order a guest receives them: At booking, Before arrival, Arrival day, During the stay, Departure and After the stay.
For each message you can see:
When it would be sent for a real guest.
The automation it comes from, and whether that automation is currently On or Off.
The snippet it sends (click it to open and edit the snippet).
Its condition (Only when), such as Guest Score > Cutoff.
All messages are ticked by default. Untick any you don't want to include.
ℹ️ Conditions are skipped during a test. Every ticked message is sent, so the test person sees every path. For example, they get both the "happy guest" review request and the "unhappy guest" follow-up.
⚠️ A message whose snippet is missing or inactive is shown with a warning and can't be selected. Fix the snippet first, then come back.
6. Start the Test
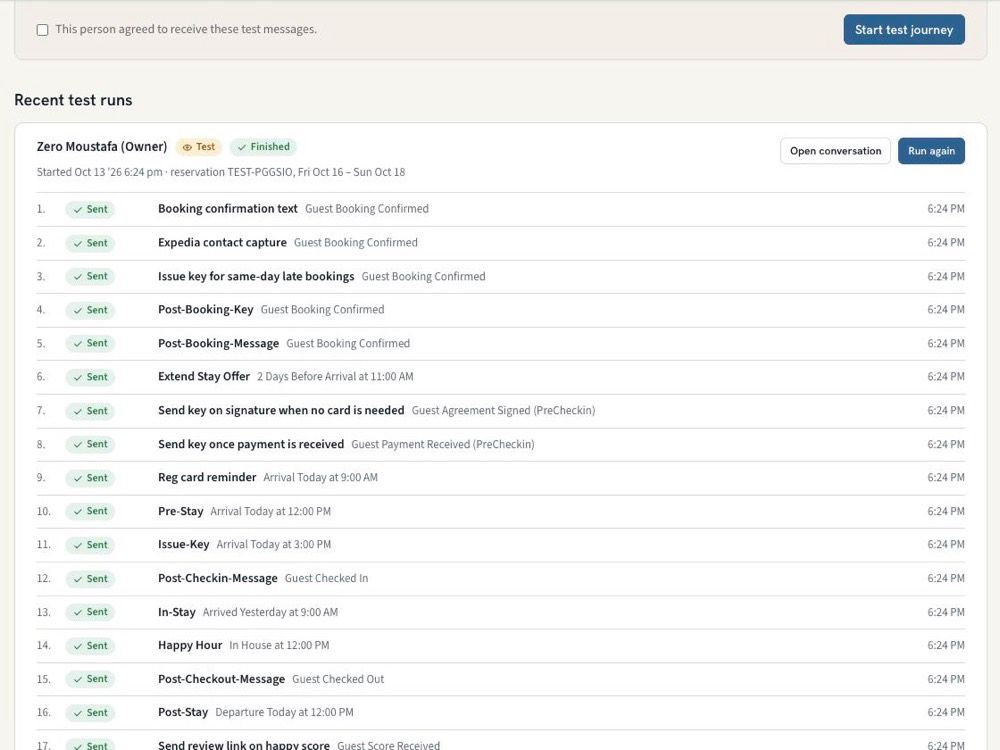
Tick This person agreed to receive these test messages, then click Start test journey. The first message goes out within a few seconds.
7. Follow the Test Run
Each run appears under Recent test runs with a status for every message: Scheduled, Sent, Not sent (with the reason) or Cancelled. Click Refresh to see the latest progress.
Open conversation shows the test person's conversation in the guest inbox, including any replies they send. Test guests carry a Test label so staff can tell them apart from real guests.
Cancel stops the run. Messages already sent stay sent, and the rest won't go out.
Run again sends the journey to the same person again with your latest snippet wording and a fresh sample reservation. This is the quickest way to review your changes after editing.
What Stays Unaffected
Your automations: nothing is switched on or off.
Other guests: only the person you entered receives messages.
Your reports: test guests are left out of guest counts, response-time stats, arrivals and occupancy.
Digital keys and live triggers: if the test person opens the check-in link, your live triggers don't fire for them, and no real door code is issued. Key messages show a sample code instead.
⚠️ Test messages are real texts and emails, so they count toward your messaging usage. If your check-in flow has a payment step turned on and the test person completes it, their card is really authorized, just as it would be for a guest.
✅ Best Practices
Write and review your snippets before starting a test.
Use Every 2 minutes or slower when the owner is reviewing with you on a call, so you can talk through each message.
Ask the test person to tap every link, including check-in, guidebook and upsells.
Use Run again after each round of edits until everyone is happy, then turn your automations On.
Related Articles
Was this helpful?
Still need help? Ask the team